QUICK FACTS
| Topic | Human Anatomy for Artists |
| Best For | Beginning to Advanced Artists |
| Reading Time | Approximately 18 minutes |
| Skills Covered | Figure Drawing, Anatomy, Gesture, Construction, Muscles, Proportion |
| Recommended Supplies | Sketchbook, Graphite Pencils, Anatomy Books |
| Difficulty | Beginner → Advanced |
Human Anatomy for Artists: The Complete Guide to Drawing the Human Body
Understanding human anatomy for artists is one of the most valuable skills you can develop.
Whether your goal is realism, comics, fantasy illustration, Pop Surrealism, character design, or classical painting, anatomy provides the foundation that makes figures feel believable.
Many beginning artists think anatomy means memorizing hundreds of muscles.
Advertisement
It doesn't.
Instead, anatomy is about understanding how the human body is constructed, how it moves, and how its forms connect together.
Once those fundamentals become familiar, drawing the human figure becomes dramatically easier.
In this guide we'll explore the skeleton, proportions, muscles, gesture, construction techniques, and practical exercises that professional artists use every day.
Short Answer: Human anatomy for artists is the study of the skeletal structure, muscles, proportions, and movement of the body to create more believable drawings and paintings. Rather than memorizing every muscle, artists should first understand the skeleton, learn simplified construction methods, and gradually build anatomical knowledge through observation and practice.
Table of Contents
- Quick Facts
- Why Anatomy Matters
- Start with the Skeleton
- Understanding Body Proportions
- Gesture Drawing
- Major Muscle Groups
- Drawing the Head
- Drawing the Hands
- Drawing the Feet
- Simplifying Anatomy
- Anatomy for Stylized Art
- Daily Practice Routine
- Recommended Books
- Recommended Art Supplies
- Frequently Asked Questions
Why Anatomy Matters
One of the biggest misconceptions among beginning artists is believing that anatomy is only important for realism.
In reality, nearly every artistic style benefits from anatomical knowledge.
Comic book artists exaggerate anatomy.
Animation artists simplify anatomy.
Concept artists redesign anatomy.
Lowbrow painters distort anatomy.
Illustrators stylize anatomy.
Yet all of these artists begin with the same understanding of how the body is built.
When anatomy is ignored, figures often appear stiff, awkward, or unintentionally distorted.
When anatomy is understood, artists gain the confidence to exaggerate forms while maintaining believable structure.
As Pablo Picasso famously demonstrated, artists often learn the rules before intentionally breaking them.
Anatomy Gives You Creative Freedom
Learning anatomy isn't about limiting creativity.
It's about increasing it.
The better you understand the body, the easier it becomes to invent poses, create original characters, and draw from imagination.
Instead of copying photographs, you'll begin constructing figures from knowledge.
That transition represents one of the biggest milestones in an artist's development.
Every Style Uses Anatomy
Even highly stylized artwork relies on anatomical understanding.
Artists such as Mark Ryden, Todd Schorr, Greg Simkins, and Audrey Kawasaki all distort proportion differently, yet their work remains convincing because the underlying structure is solid.
If you enjoyed our exploration of Pop Surrealism, be sure to read:
→ The Complete Guide to Lowbrow Art Techniques
Understanding anatomy will make every artistic style stronger.
Start with the Skeleton
Before muscles...
Before skin...
Before clothing...
There is the skeleton.
The skeleton acts as the framework that supports every pose, every gesture, and every movement.
Many experienced artists spend more time studying bones than muscles because bones determine the body's proportions and major landmarks.
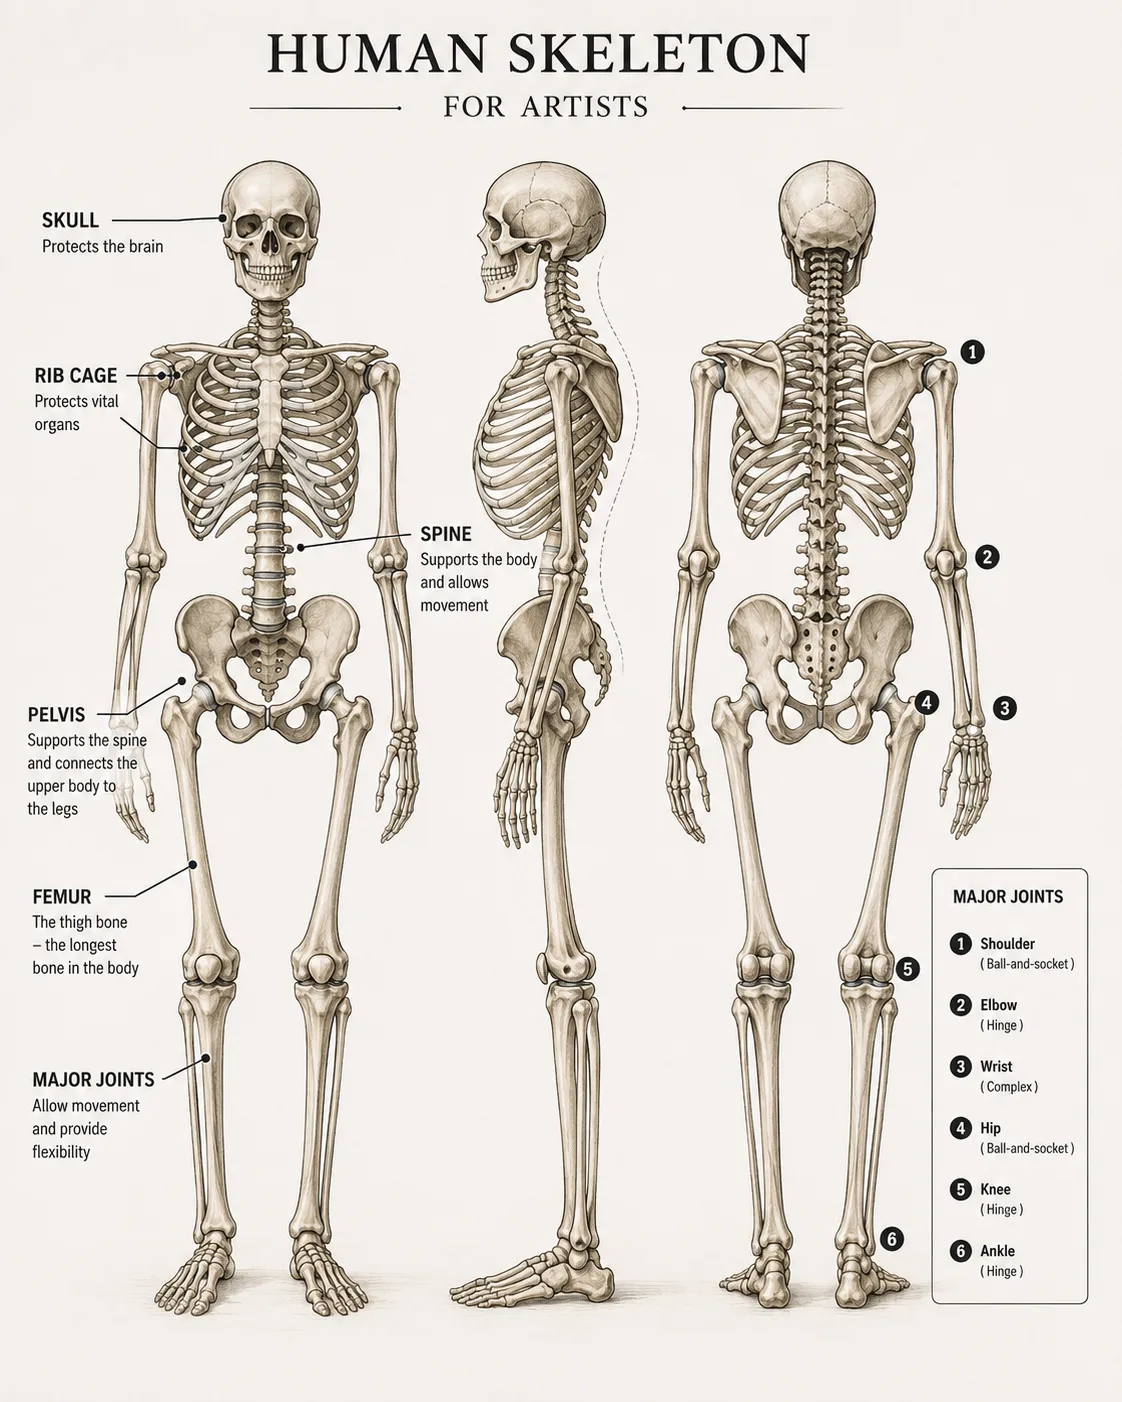
Rather than memorizing all 206 bones, artists should become familiar with the major structures that influence surface form.
These include:
- Skull
- Rib cage
- Spine
- Pelvis
- Clavicles
- Scapulae
- Humerus
- Radius
- Ulna
- Femur
- Tibia
- Fibula
Understanding how these bones connect will immediately improve your figure drawings.
The Rib Cage
Think of the rib cage as a slightly compressed egg.
Nearly every torso begins with this simple shape.
The rib cage protects vital organs while providing attachment points for many major muscles.
Learning to draw this form accurately makes constructing the torso significantly easier.
The Pelvis
The pelvis acts like the body's foundation.
It supports the spine while connecting the legs to the torso.
Many drawing errors occur because beginning artists underestimate how much the pelvis rotates and tilts during movement.
Practice drawing the pelvis independently before attaching legs or the torso.
The Spine
The spine is not a straight line.
It contains gentle curves that help balance the body's weight.
Understanding these curves dramatically improves standing poses and gesture drawings.
Artist Exercise
Draw only the skeleton.
Don't worry about muscles.
Don't add clothing.
Don't add facial features.
Instead, practice drawing:
- Rib cages
- Pelvises
- Skull shapes
- Spinal curves
Mastering these simple structures creates a solid foundation for everything that follows.
Understanding Body Proportions
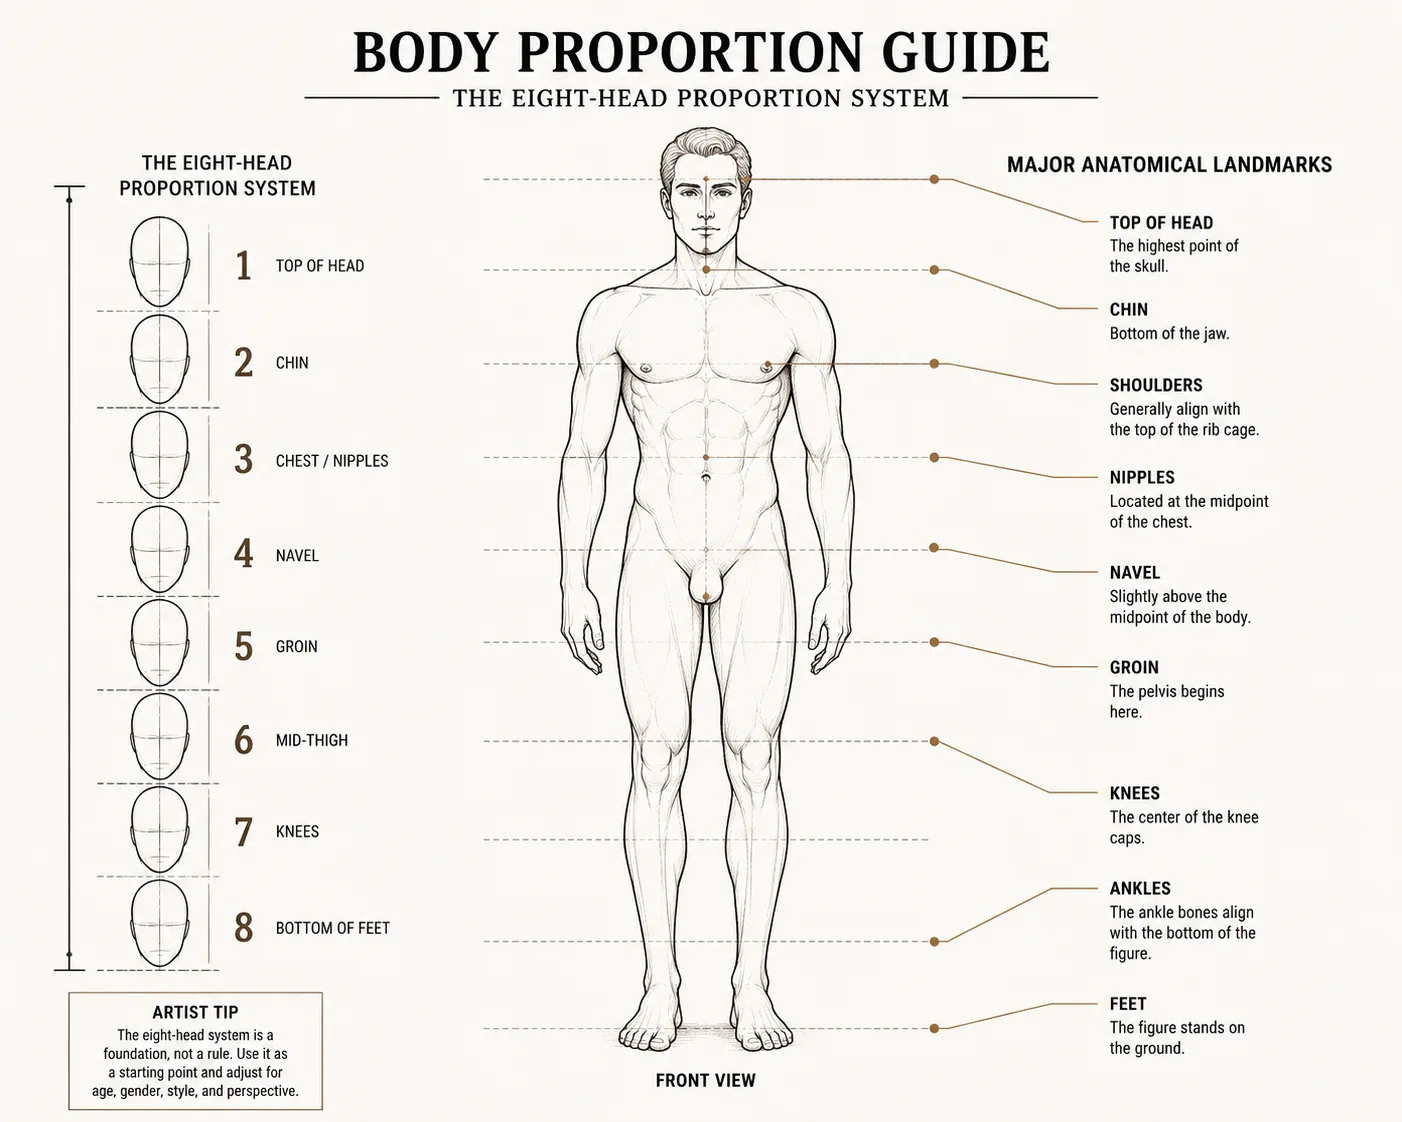
One of the first concepts artists encounter is the "head" measurement.
Rather than measuring the body in inches or centimeters, artists traditionally use the height of the head as a unit.
An average adult figure is often represented as approximately 7½ to 8 heads tall, although actual proportions vary significantly from person to person.
Using this system provides a reliable framework when constructing figures from imagination.
Typical Adult Proportions
- Head
- Chin
- Nipples
- Navel
- Pelvis
- Mid-thigh
- Knees
- Ankles
- Feet
These landmarks help artists maintain believable proportions while sketching quickly.
Remember that proportion systems are guides—not rigid rules.
Children, older adults, athletes, and stylized characters all deviate from these measurements.
Learning the standard model first makes it easier to intentionally modify later.
Don't Chase Perfection
One of the biggest mistakes beginners make is obsessing over exact measurements.
Professional artists rarely measure every body part.
Instead, they train their eye to recognize proportion relationships naturally.
With practice, those relationships become intuitive.
Gesture Drawing: Capturing Life Before Detail
One of the biggest mistakes beginning artists make is focusing on details too early.
They draw eyes before the head.
Fingers before the hand.
Muscles before the pose.
Professional artists do the opposite.
They begin with gesture.
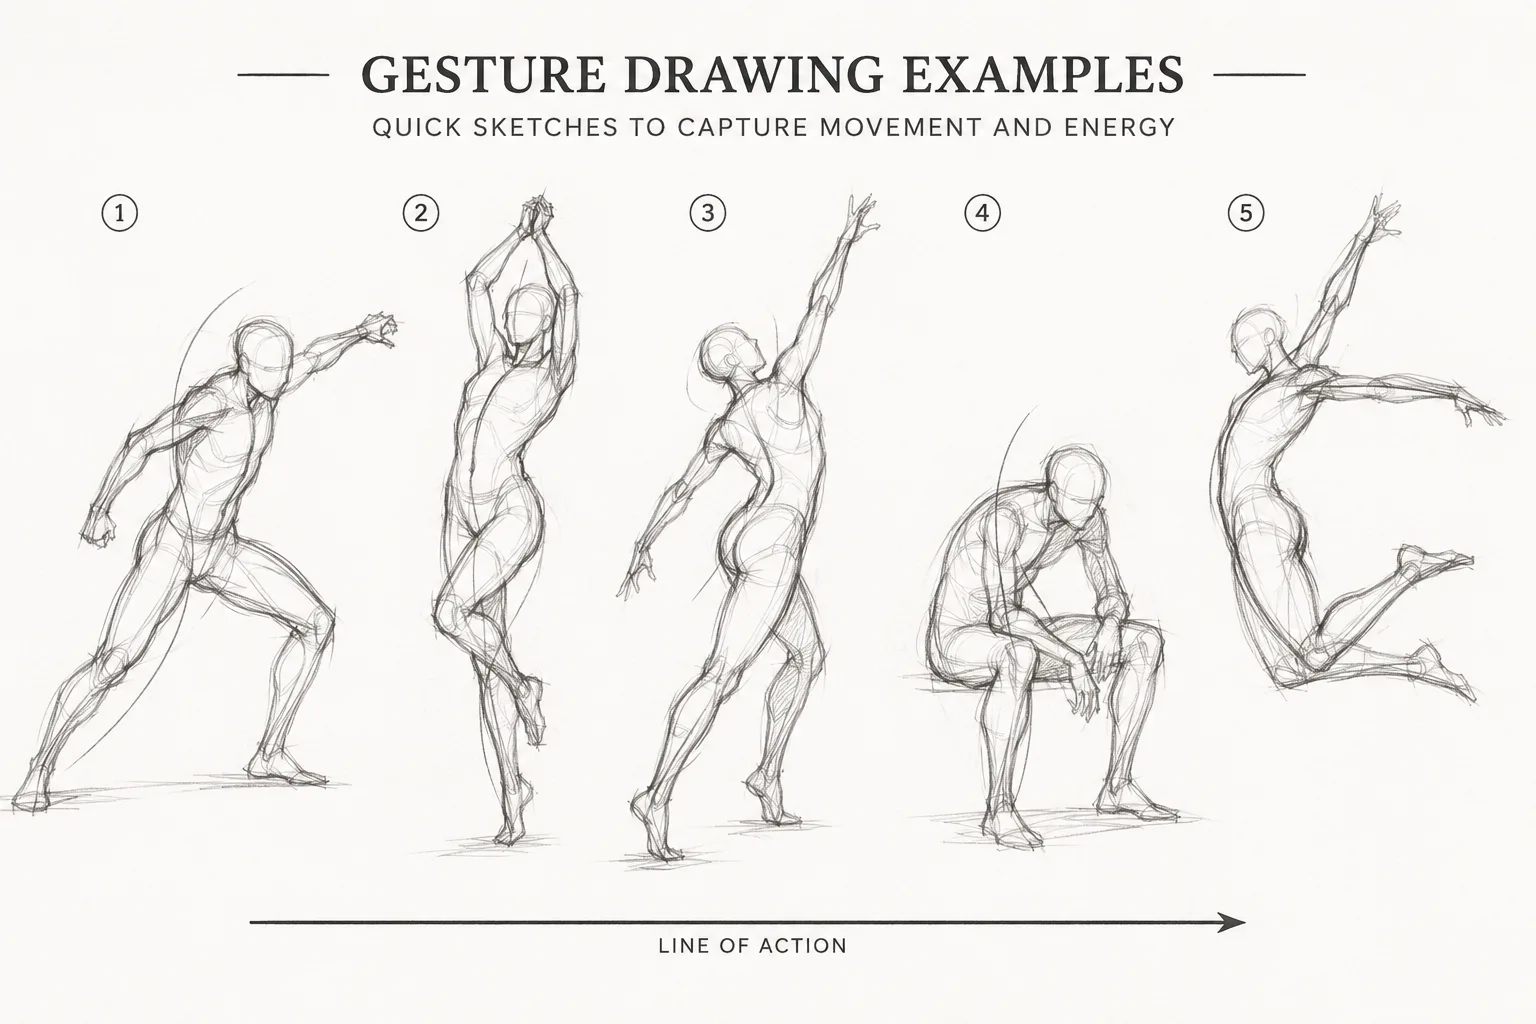
Gesture drawing captures the movement, rhythm, balance, and energy of a pose before any anatomy is added.
A successful gesture drawing may contain only a few lines, yet still communicate motion more effectively than a highly detailed drawing.
Think of gesture as the heartbeat of the figure.
Without it, anatomy feels stiff.
With it, even simple drawings feel alive.
Start with the Line of Action
Every pose contains an invisible rhythm.
Artists often represent this using a single flowing curve called the Line of Action.
This line describes the body's overall movement before individual body parts are constructed.
Rather than drawing the torso, hips, arms, and legs separately, begin by asking:
"What is the body doing?"
Once you understand the movement, everything else becomes easier.
Draw Fast
Gesture drawing should be quick.
Try drawing poses for:
- 30 seconds
- 1 minute
- 2 minutes
- 5 minutes
The time limit forces you to ignore unnecessary detail and focus on movement instead.
Many professional illustrators warm up with dozens of gesture drawings before beginning finished artwork.
Artist Exercise
Spend fifteen minutes drawing nothing but gesture.
Don't erase.
Don't shade.
Don't add muscles.
Capture only movement.
After twenty or thirty poses, you'll begin seeing the body differently.
Understanding Major Muscle Groups
Many artists become overwhelmed trying to memorize every muscle in the human body.
Fortunately, you don't need to.
Instead, begin with the muscles that most influence the body's visible form.
Learning these major groups first provides the greatest improvement for the least amount of memorization.
The most important muscle groups include:
- Deltoids
- Pectorals
- Latissimus Dorsi
- Trapezius
- Biceps
- Triceps
- Forearm Flexors
- Abdominals
- Obliques
- Gluteals
- Quadriceps
- Hamstrings
- Calves
These muscles create the forms artists observe most frequently.
Drawing the Torso
The torso is often considered the most important part of figure drawing.
It contains the body's largest masses and establishes the overall rhythm of the pose.
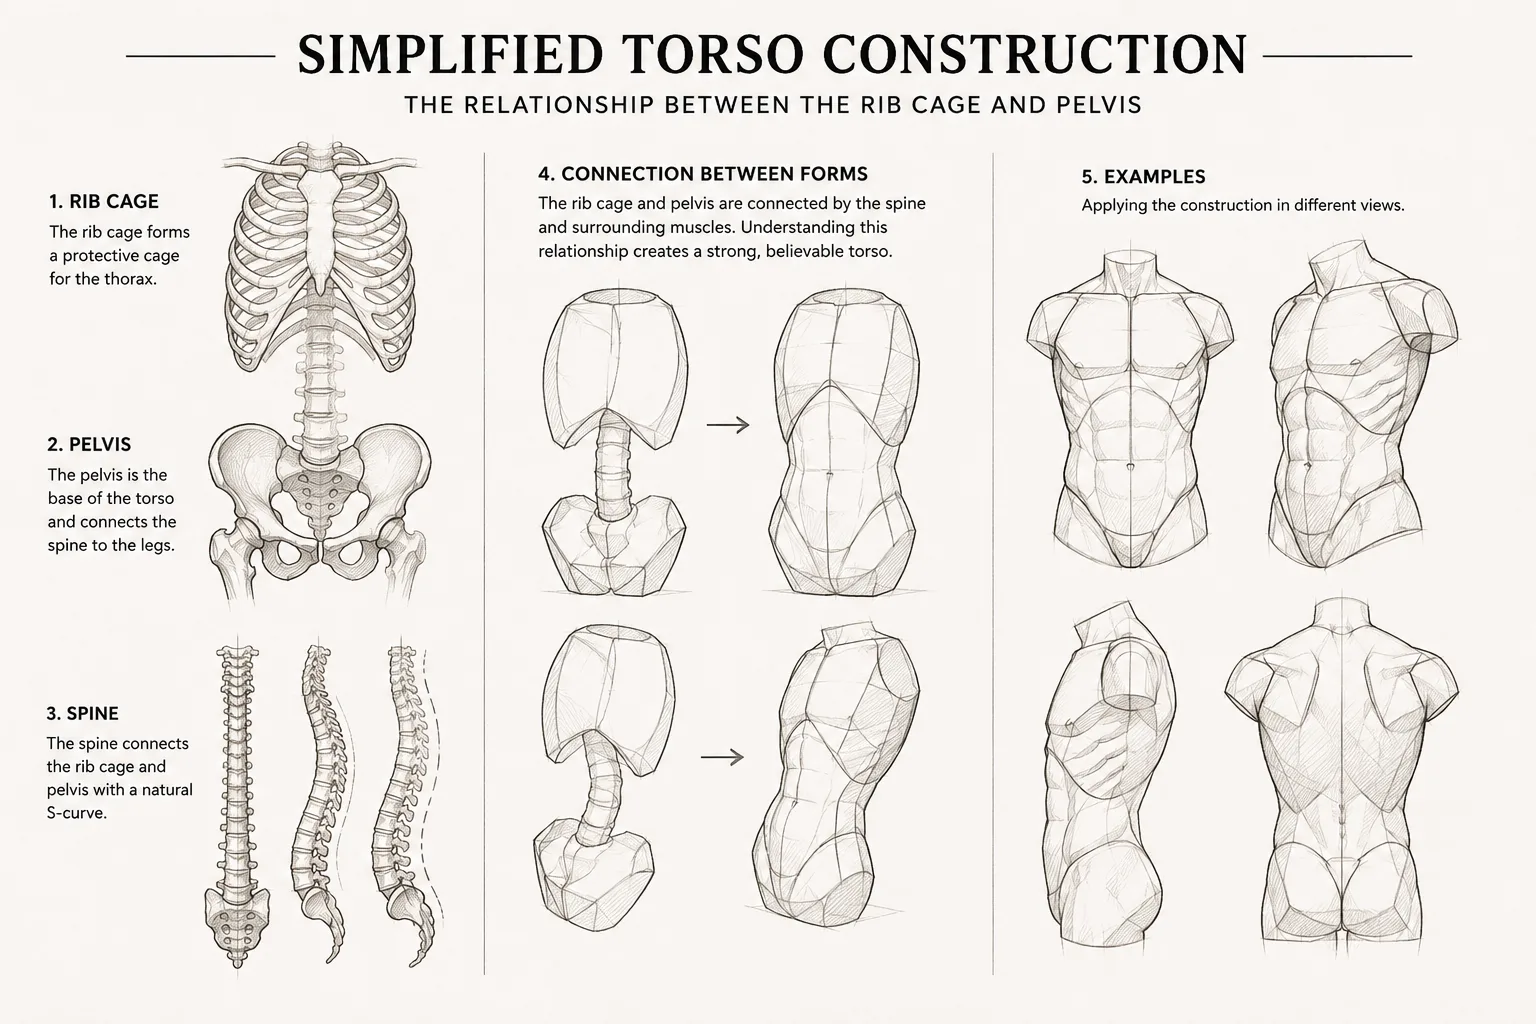
Rather than thinking about individual muscles immediately, simplify the torso into two primary forms:
- Rib Cage
- Pelvis
These two forms twist, bend, rotate, and tilt independently.
Understanding that relationship makes dynamic poses far easier to construct.
The Rib Cage
Remember the egg shape discussed earlier.
The rib cage rarely faces exactly the same direction as the pelvis.
Instead, it rotates during movement.
Observing this rotation creates more convincing poses.
The Pelvis
The pelvis acts like a bowl.
It tips forward.
It tips backward.
It rotates.
Understanding those subtle changes dramatically improves standing and seated figures.
Connecting the Forms
The abdomen connects the rib cage to the pelvis.
Rather than viewing the torso as one solid block, think of it as two separate masses joined by flexible muscles.
This approach creates more natural movement.
Drawing the Arms
The arm appears complicated because of the forearm.
Fortunately, the upper arm is surprisingly simple.
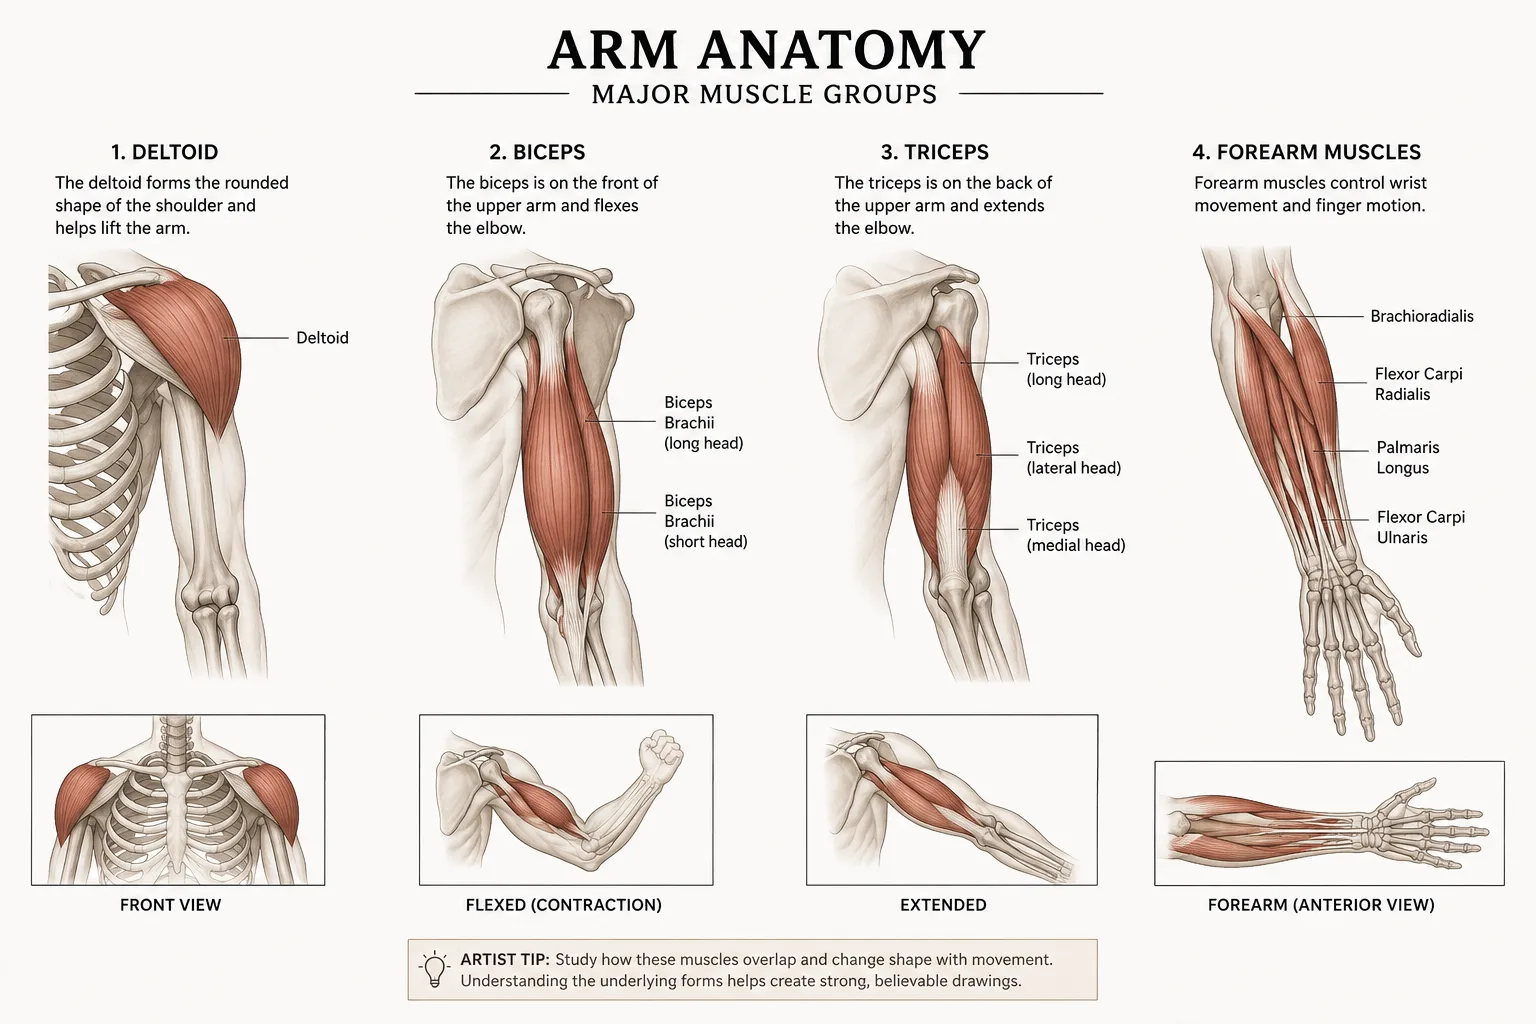
Begin with cylinders.
The shoulder becomes a sphere.
The upper arm becomes a cylinder.
The forearm tapers toward the wrist.
Only after these simple forms feel convincing should muscles be added.
Important Muscles
Artists should become familiar with:
- Deltoid
- Biceps
- Triceps
- Brachioradialis
- Forearm flexors
You don't need to memorize every attachment point.
Instead, learn how these muscles affect the arm's silhouette.
Watch the Elbow
Many beginners place the elbow too low.
As a rule of thumb, the elbow generally aligns near the bottom of the rib cage.
Observing this relationship improves proportion immediately.
Drawing Hands
Hands intimidate almost every artist.
The reason is simple.
Hands contain many moving parts.
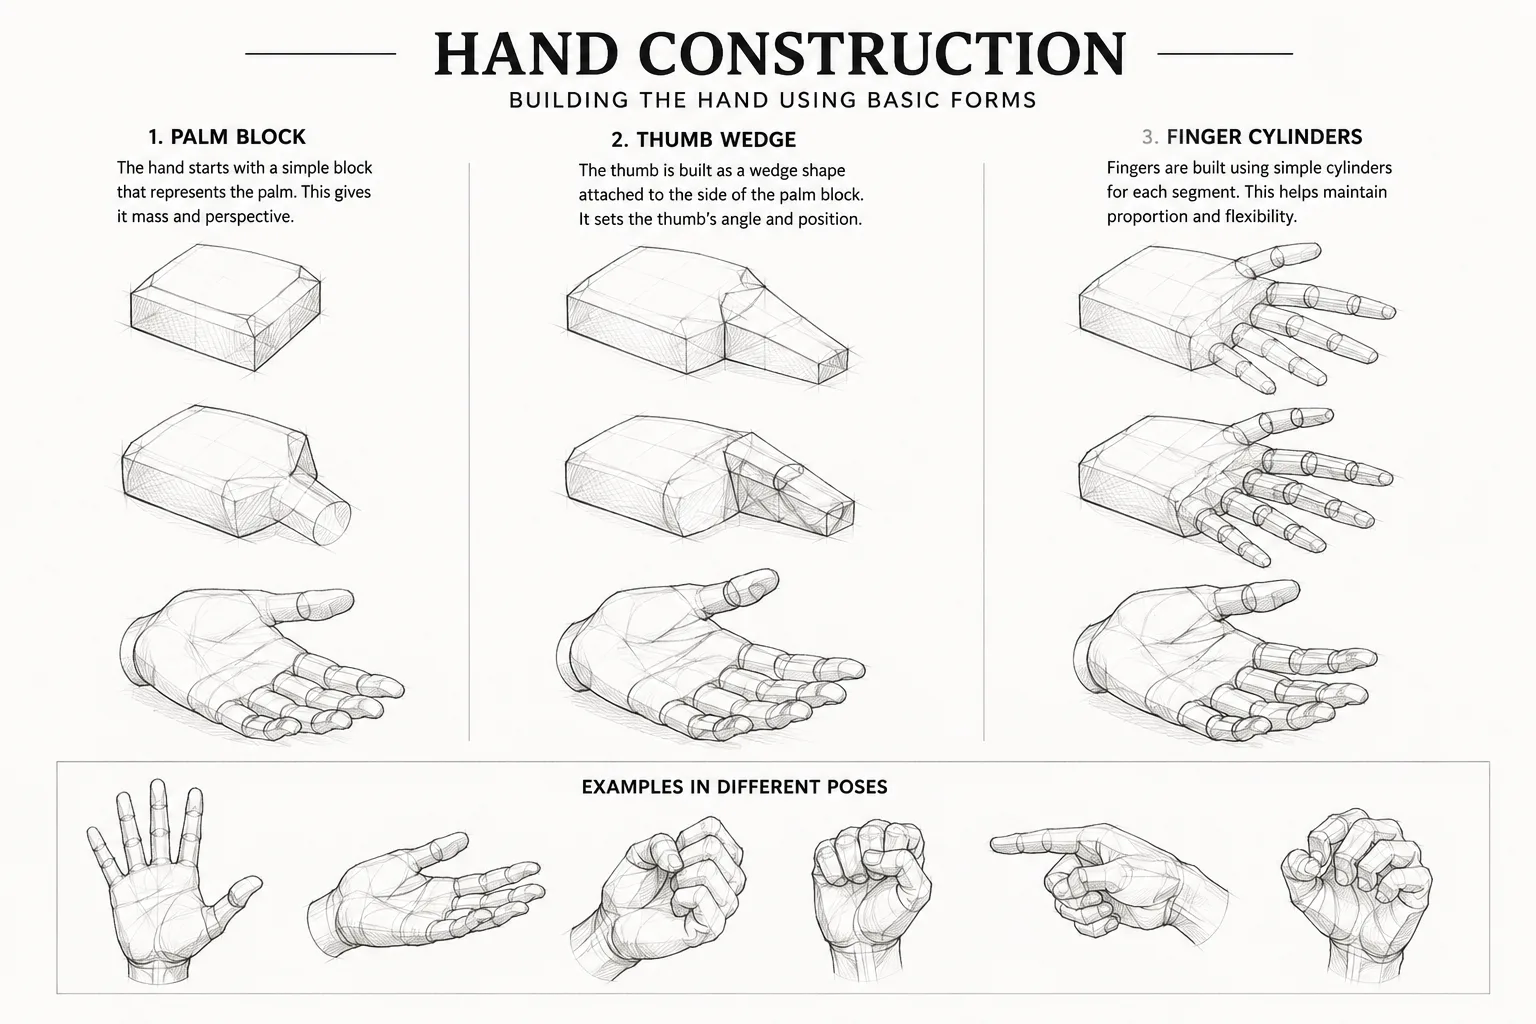
Rather than drawing fingers individually, simplify the hand into three forms:
- Palm
- Thumb
- Finger block
Once these forms are established, individual fingers become much easier to place.
Think Like a Sculptor
Imagine building the hand from blocks rather than outlines.
This approach improves perspective while making hands easier to rotate mentally.
Practice Hands Every Day
Instead of attempting perfect finished drawings, fill sketchbook pages with small hand studies.
Over time you'll build visual memory.
Drawing the Legs
The legs provide stability, balance, and movement.
Like the arms, they can first be simplified into cylinders before adding anatomy.
The largest visible muscle groups include:
- Quadriceps
- Hamstrings
- Calves
Remember that knees function as important landmarks.
Avoid drawing perfectly straight legs.
Even standing poses contain subtle curves and weight shifts.
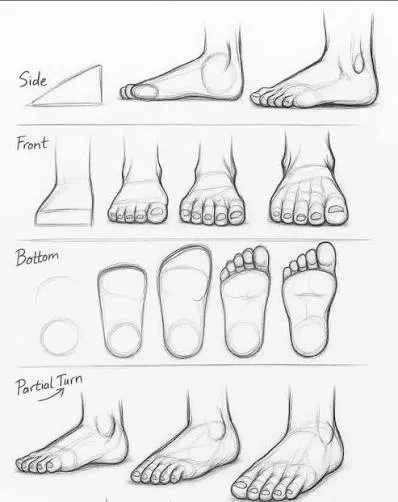
Drawing Feet
Feet are often overlooked during figure drawing.
However, they determine balance.
Think of the foot as a wedge.
Begin with a simple triangular block.
Add the heel.
Then indicate the arch.
Finally, separate the toes.
Avoid drawing each toe individually during early construction.
Focus instead on the overall shape.
Drawing the Head
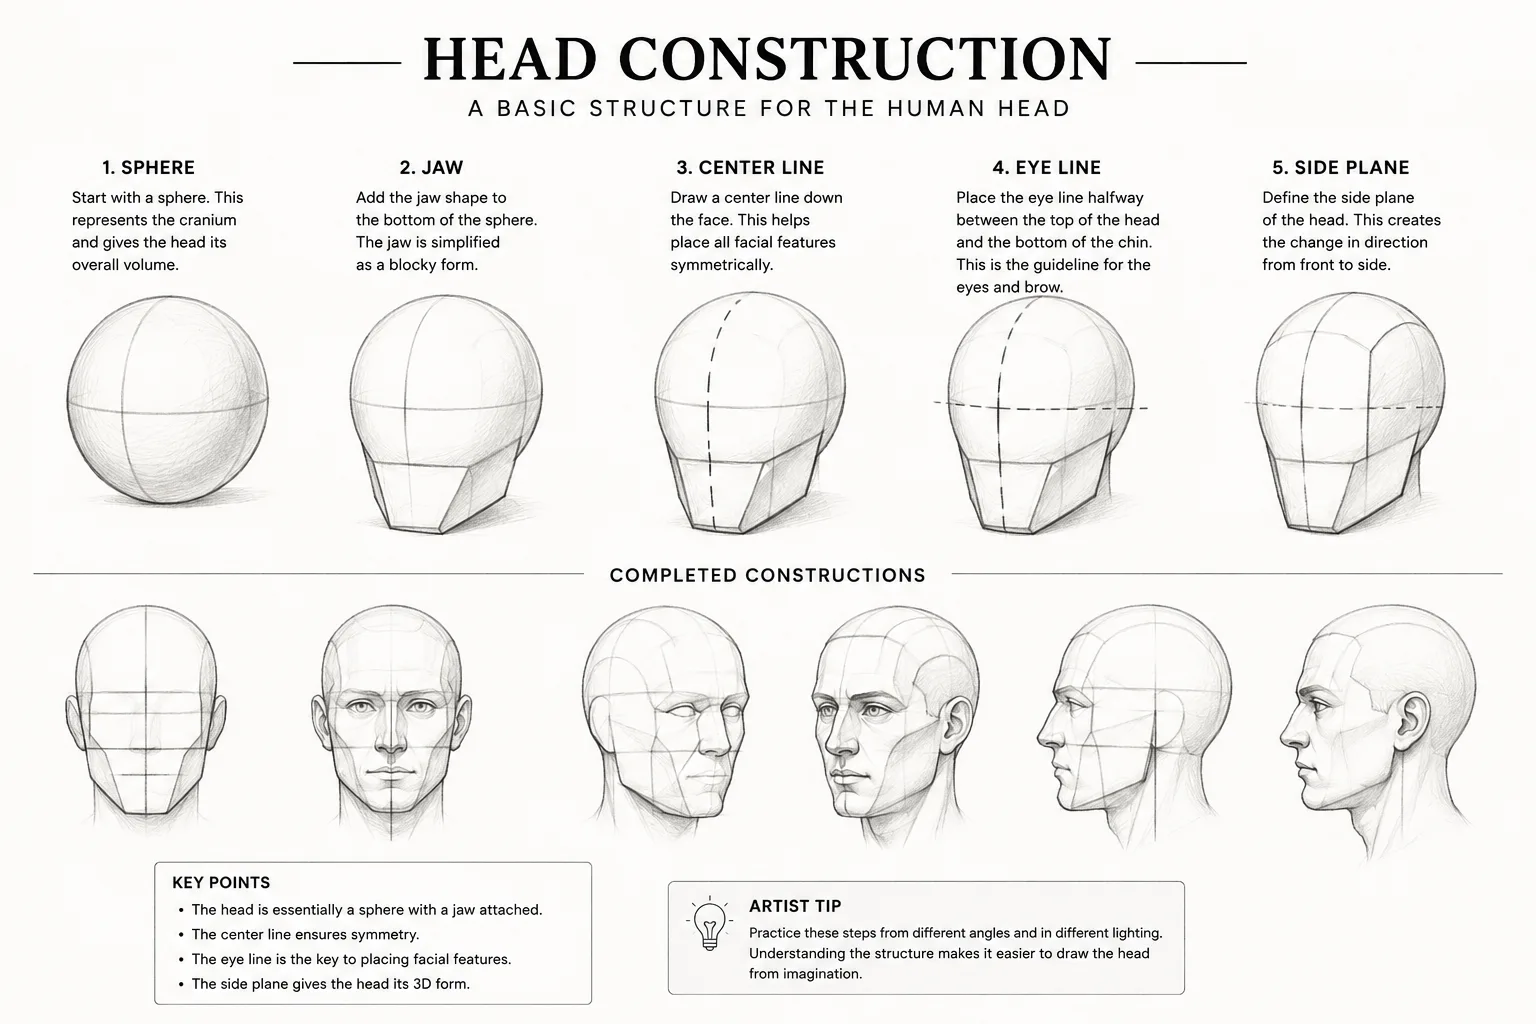
The head deserves years of study on its own.
Fortunately, artists can begin with surprisingly simple construction methods.
Many artists start with:
- A sphere
- A jaw block
- Center line
- Eye line
From there, the facial features can be positioned more consistently.
Learning head construction first makes portrait drawing significantly easier than trying to copy outlines directly.
Don't Memorize Features
Instead, memorize the underlying forms.
The nose is a three-dimensional structure.
The eye sits inside the skull.
The lips wrap around the teeth.
Thinking structurally rather than symbolically leads to more believable drawings.
Simplifying Anatomy into Basic Forms
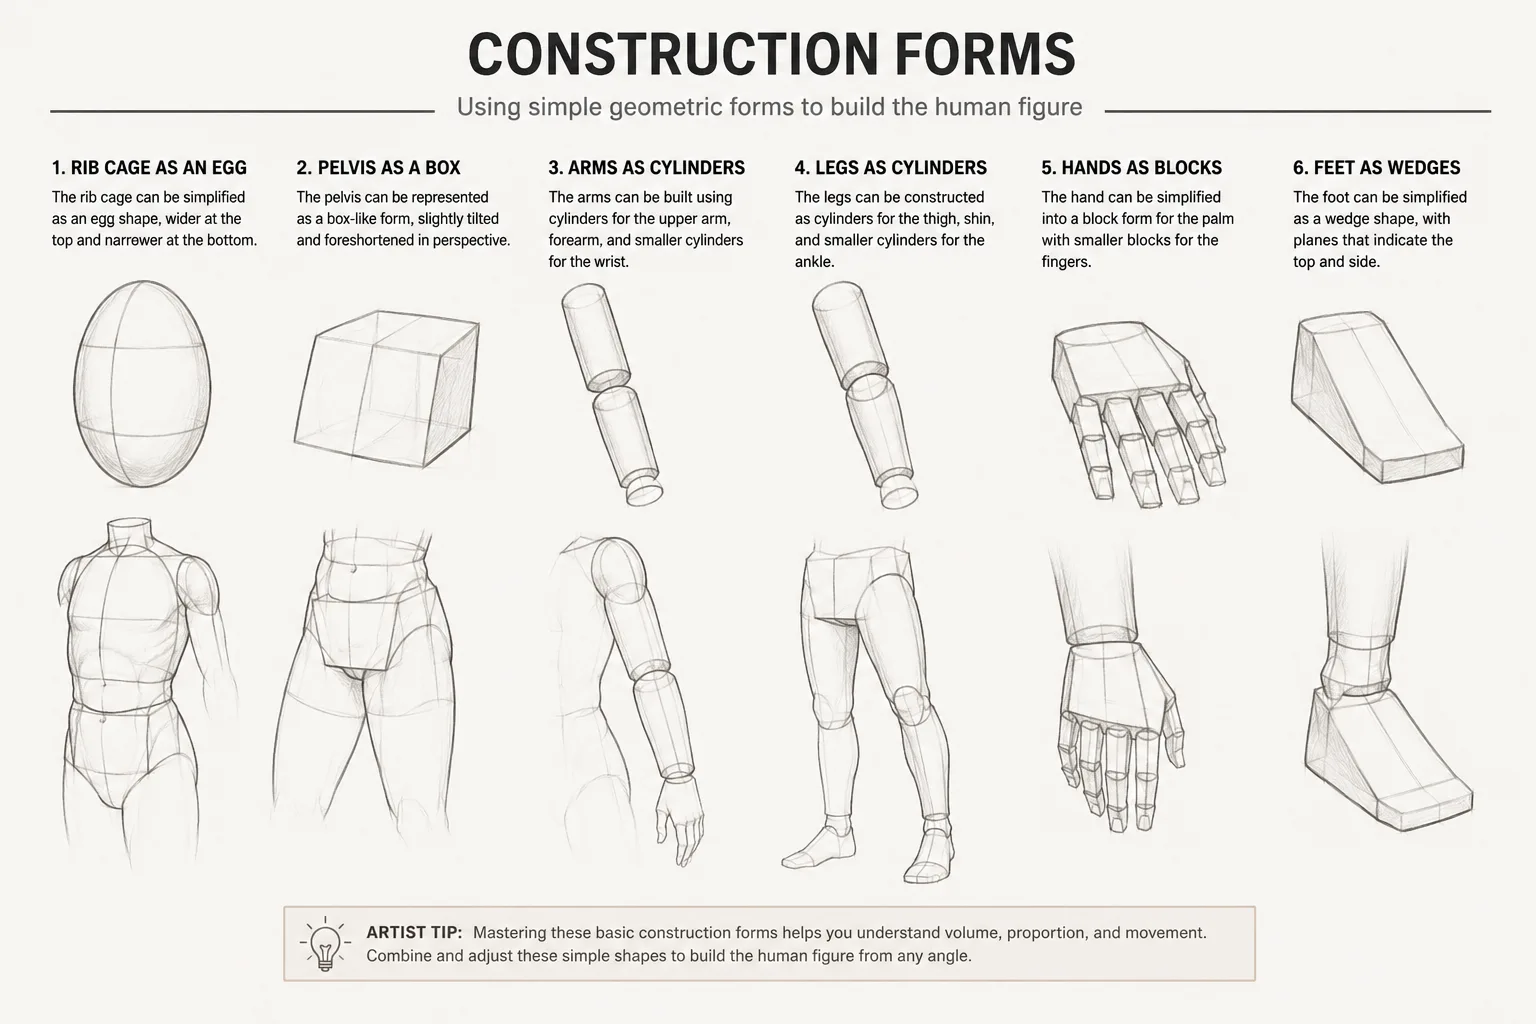
One of the biggest breakthroughs in learning anatomy comes when artists realize they are not actually drawing muscles—they're drawing simple three-dimensional forms.
Professional artists rarely begin a figure by carefully outlining every contour.
Instead, they think like sculptors.
Before adding detail, they construct the body using basic geometric shapes.
These simple forms create a framework that makes perspective, proportion, and anatomy much easier to understand.
Every Figure Begins with Simple Shapes
You can simplify nearly every part of the body into a combination of:
- Spheres
- Boxes
- Cylinders
- Wedges
- Eggs
For example:
- The rib cage becomes an egg.
- The pelvis becomes a box or bowl.
- The arms become cylinders.
- The legs become tapered cylinders.
- The hands become blocks.
- The feet become wedges.
- The head begins as a sphere.
Once these forms feel solid, muscles become much easier to layer on top.
Think in Three Dimensions
Instead of drawing outlines, imagine you're building a clay sculpture.
Ask yourself:
- Which direction is this form facing?
- Is it rotating?
- Is it tilting?
- What overlaps what?
- Where is the light hitting?
These questions dramatically improve drawing accuracy.
Artists who think three-dimensionally can invent poses without relying entirely on photographs.
Anatomy for Stylized Art
Many artists assume anatomy only matters if they're trying to paint realistically.
Nothing could be further from the truth.
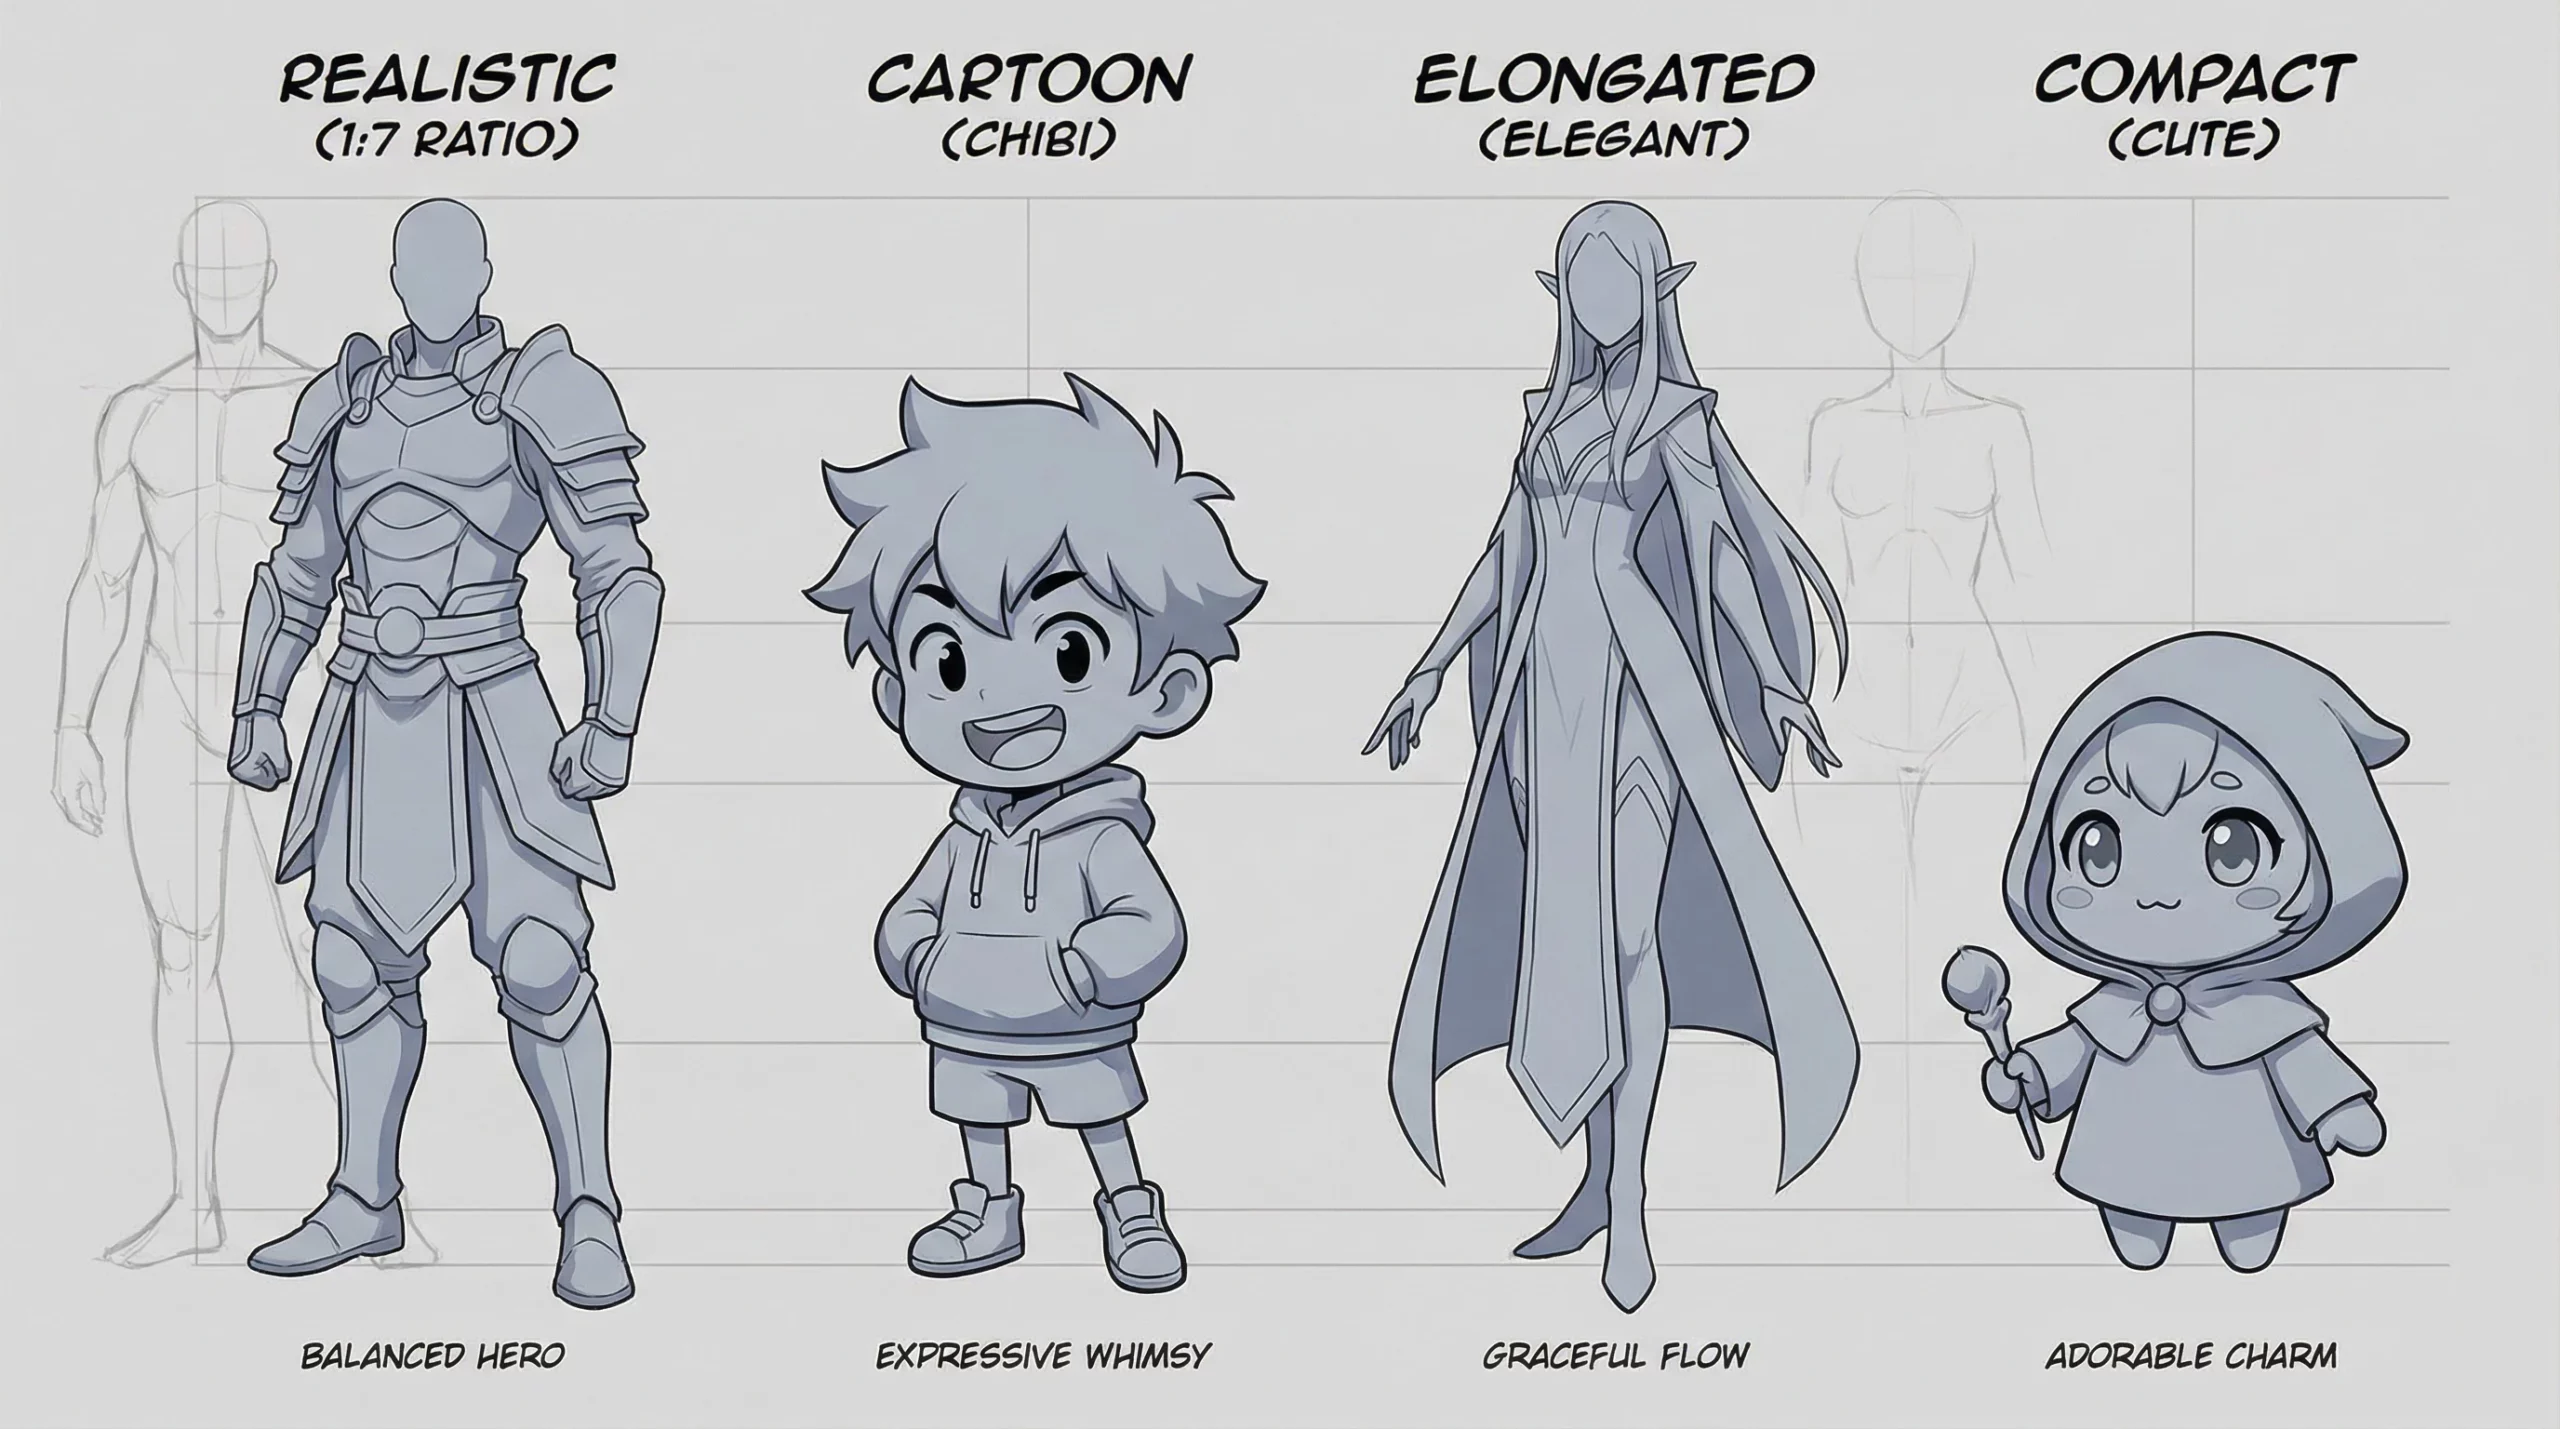
Stylization actually requires more anatomical knowledge, not less.
Every successful stylized artist understands the rules before bending or breaking them.
This is especially true in:
- Lowbrow Art
- Pop Surrealism
- Character Design
- Comics
- Animation
- Fantasy Illustration
Understanding anatomy allows artists to exaggerate features without making figures feel unintentionally awkward.
Exaggeration Works Because Structure Exists
Look closely at the work of artists such as:
- Mark Ryden
- Todd Schorr
- Greg "Craola" Simkins
- Marion Peck
- Audrey Kawasaki
Their figures often have:
- oversized heads
- elongated limbs
- exaggerated eyes
- simplified hands
- impossible proportions
Yet they still feel believable.
Why?
Because underneath the stylization lies an understanding of anatomy, weight, balance, and proportion.
The anatomy hasn't disappeared.
It's simply been reinterpreted.
Stylization is Controlled Distortion
Instead of copying reality exactly, artists decide which elements to emphasize.
For example:
- Larger eyes increase emotional expression.
- Longer legs create elegance.
- Smaller noses simplify facial structure.
- Larger hands suggest strength.
- Shorter torsos create cartoon appeal.
These decisions work best when grounded in anatomical knowledge.
Common Anatomy Mistakes
Every artist makes mistakes while learning anatomy.
Fortunately, most mistakes repeat themselves.
Recognizing them early dramatically speeds improvement.
Drawing Symbols Instead of Forms
Beginners often draw:
- almond-shaped eyes
- triangle noses
- stick fingers
Instead, think about volume.
Everything occupies three-dimensional space.
Ignoring the Skeleton
Muscles cannot exist without bones.
If the skeleton is incorrect, the muscles will also look incorrect.
Always begin with construction.
Drawing Every Muscle
More anatomy is not always better.
Trying to include every visible muscle often makes figures appear overly complicated.
Instead, simplify.
Focus on the muscles that contribute most to the silhouette.
Stiff Poses
Figures become stiff when artists skip gesture drawing.
Always establish movement before structure.
Movement first.
Construction second.
Details last.
Perfect Symmetry
The human body is rarely perfectly symmetrical.
One shoulder sits higher.
The pelvis tilts.
Weight shifts.
These subtle asymmetries make drawings feel alive.
Artist Exercise
Choose five standing poses.
Draw each pose three times.
Version One
Gesture only.
Version Two
Construction only.
Version Three
Finished anatomy.
Comparing these three stages reveals how professional figure drawings are built.
A Simple Daily Anatomy Practice Routine
Consistency matters far more than marathon drawing sessions.
Even twenty focused minutes each day will produce significant improvement over time.
Here's a routine many artists can realistically maintain.
Five Minutes
Gesture drawing.
Thirty-second poses.
Focus on movement.
Five Minutes
Skeleton studies.
Practice rib cages, pelvises, skulls, and spinal curves.
Five Minutes
Hands or feet.
Alternate each day.
Five Minutes
Study from an anatomy book.
Don't copy every detail.
Instead, ask:
"What simplified forms create this muscle?"
Small, consistent sessions are more effective than occasional eight-hour study marathons.
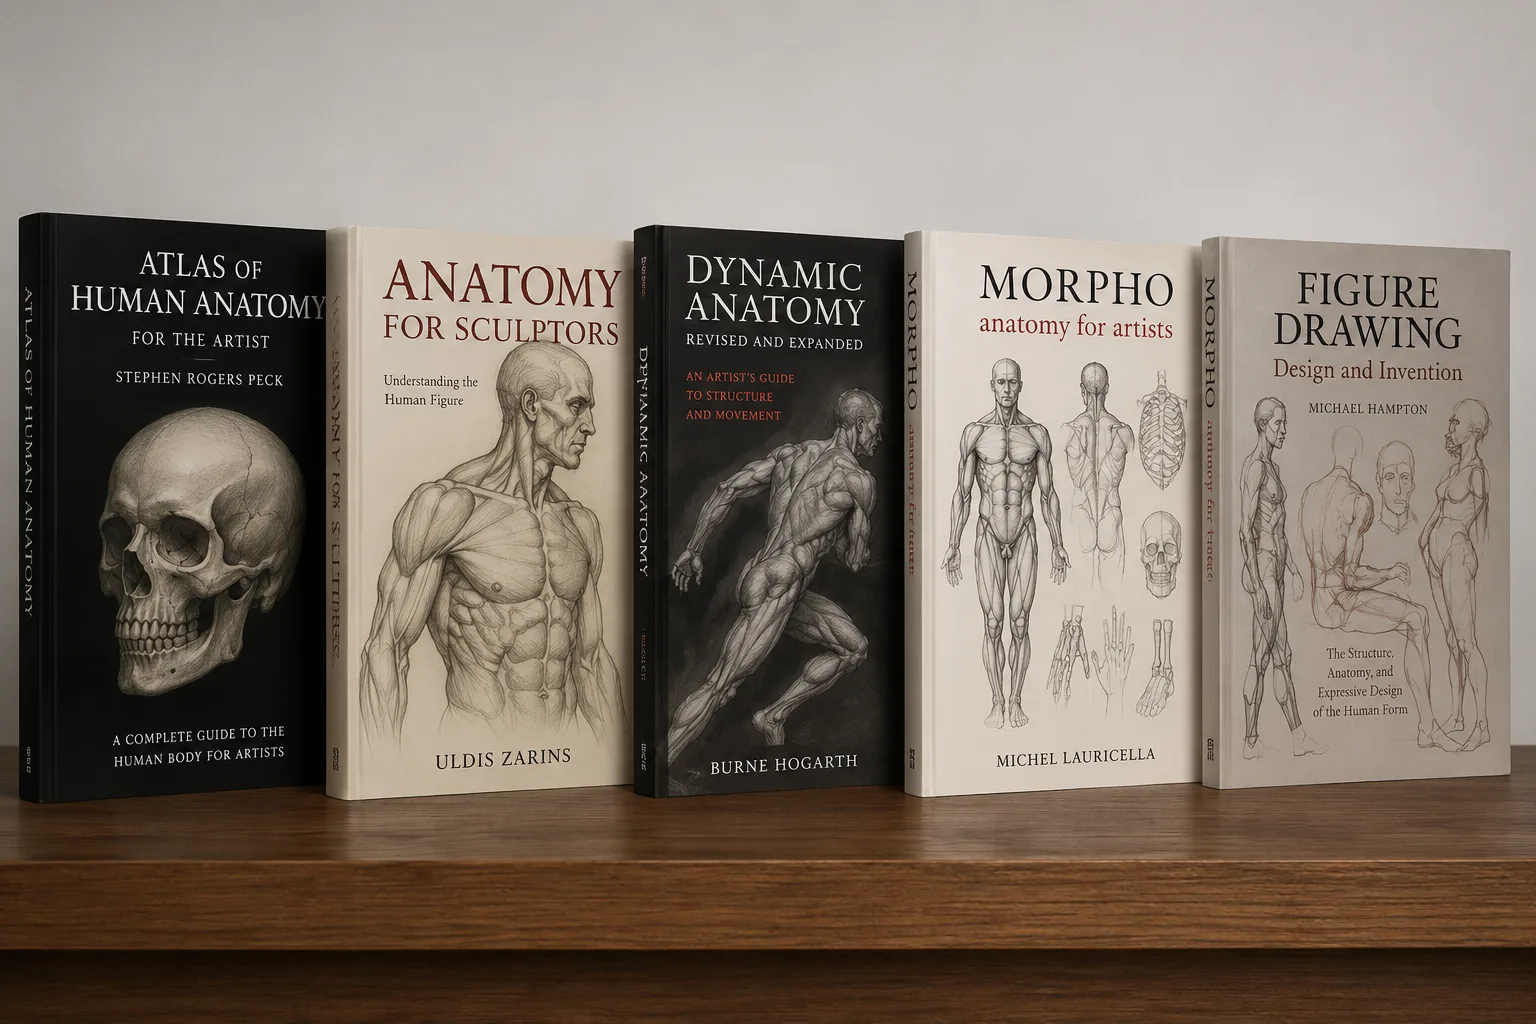
Recommended Anatomy Books
Every artist should own at least one high-quality anatomy reference.
Below are several classics that have influenced generations of illustrators, painters, and concept artists.
Figure Drawing: Design and Invention
One of the most respected modern anatomy books for artists.
Recommended For
Intermediate to advanced figure drawing.
Affiliate Link
Atlas of Human Anatomy for the Artist
Excellent reference for surface anatomy.
Beautiful photographs.
Detailed muscle studies.
Morpho Series
Excellent for understanding simplified construction.
Great for sketchbook practice.
Anatomy for Sculptors
One of the best modern visual references available.
Highly recommended for illustrators and digital artists.
Figure Drawing for All It's Worth
Andrew Loomis remains one of the greatest drawing teachers of all time.
This classic belongs on every artist's bookshelf.
Recommended Drawing Supplies
Learning anatomy doesn't require expensive materials.
A few quality tools are enough.
Graphite Pencil Set
Perfect for gesture, construction, and finished figure drawings.
Strathmore 400 Series Sketch Pad
Excellent paper for anatomy practice.
Kneaded Eraser
Ideal for lifting graphite without damaging paper.
Wooden Artist Mannequin
Useful for studying proportion and posing.
Adjustable Drawing Board
Improves posture during longer drawing sessions.
Continue Learning
Learning anatomy isn't something artists finish.
It's something they continually revisit throughout their careers.
Each sketchbook.
Each painting.
Each portrait.
Each figure study reinforces your understanding.
The goal isn't memorization.
The goal is observation.
As your visual library grows, you'll rely less on reference images and more on your understanding of form.
That's when drawing the human figure becomes not only easier—but far more enjoyable.
Frequently Asked Questions
How long does it take to learn human anatomy for artists?
Learning anatomy is a long-term process rather than a single milestone. Most artists begin seeing noticeable improvements after a few months of consistent practice. Mastering anatomy, however, often takes years of observation, sketching, and life drawing.
Do I need to memorize every muscle?
No.
Professional artists rarely memorize every muscle in the human body. Instead, focus on understanding the major muscle groups that influence the body's surface and silhouette. As your skills improve, you'll naturally recognize smaller muscles through repeated study.
Should beginners study bones before muscles?
Yes.
The skeleton forms the foundation of every figure. Understanding the rib cage, pelvis, spine, and major joints makes learning muscles much easier.
What is the best anatomy book for artists?
Several books have become classics among artists.
Popular choices include:
- Figure Drawing: Design and Invention
- Figure Drawing for All It's Worth
- Atlas of Human Anatomy for the Artist
- Anatomy for Sculptors
- Morpho: Anatomy for Artists
Each approaches anatomy from a slightly different perspective, making them valuable references throughout your artistic journey.
Is anatomy necessary for stylized art?
Absolutely.
Whether you draw comics, animation, fantasy, Pop Surrealism, or Lowbrow art, understanding anatomy gives you the confidence to simplify or exaggerate the figure while maintaining believable structure.
Stylization works best when it is built on knowledge rather than guesswork.
How often should I practice anatomy?
A short daily practice routine is far more effective than occasional marathon sessions.
Even twenty focused minutes per day can produce remarkable improvement over time.
Consistency beats intensity.
Is drawing from photographs enough?
Photographs are useful, but they have limitations.
Studying from life, anatomy books, sculptures, and skeleton references helps artists understand forms that photographs often hide.
The strongest artists combine all of these resources.
Should I trace anatomy references?
Tracing can help beginners understand construction, but it should only be used as a learning exercise.
After tracing, redraw the figure from memory.
Then draw it again from a different angle.
This process builds genuine understanding rather than dependence.
Why do my figures look stiff?
Stiffness usually comes from skipping gesture drawing.
Always begin with movement.
Capture the action first.
Build the anatomy second.
Refine the details last.
How can I improve faster?
The fastest improvement comes from combining several types of study:
- Gesture drawing
- Construction exercises
- Anatomy studies
- Master copies
- Drawing from life
- Sketching from imagination
Each teaches a different skill.
Should I learn anatomy digitally or traditionally?
Both approaches work well.
Traditional drawing often improves observation skills, while digital tools make experimentation easier.
The principles of anatomy remain exactly the same regardless of medium.
Is life drawing still important?
Yes.
Even with today's abundance of photographs and 3D software, drawing from a live model remains one of the best ways to understand gesture, weight, balance, and proportion.
Can anatomy help me draw from imagination?
Absolutely.
The better you understand the body's construction, the less dependent you'll become on photographic reference.
Many professional illustrators begin with imagination and use reference only to verify details.
What should I study after anatomy?
Once you're comfortable with anatomy, continue developing your understanding of:
- Perspective
- Light and shadow
- Composition
- Color theory
- Storytelling
- Visual design
Together, these skills transform accurate drawings into compelling works of art.
Continue Your Artistic Journey
Human anatomy is only one piece of becoming a stronger artist.
Continue building your skills with these guides from The Artillerist:
- The Complete Guide to Lowbrow Art Techniques
- Best Art Supplies for Artists (2026 Buyer's Guide)
- Best Sketchbooks for Artists
- Color Theory for Artists (coming soon)
- Drawing Hands Like a Professional (coming soon)
As new guides are published, revisit this article to continue expanding your understanding of the human figure.
Recommended Resources
Online Figure Drawing References
Helpful resources for daily practice include:
- Line of Action
- QuickPoses
- PoseSpace
- SketchDaily Reference Site
Use these tools to practice gesture drawing, timed figure studies, and anatomy from multiple viewpoints.
References
This guide was informed by established principles of figure drawing and anatomy education commonly taught by professional artists, instructors, and anatomy references. Readers are encouraged to continue learning through observation, life drawing, and reputable anatomy books.
The Artillerist's Take
Understanding anatomy isn't about becoming a medical expert.
It's about becoming a better storyteller.
Every believable character begins with structure.
Every expressive pose begins with gesture.
Every convincing painting begins with understanding how the body moves through space.
One of the greatest misconceptions among artists is believing that anatomy limits creativity.
In reality, the opposite is true.
The more you understand the human body, the more freedom you gain to exaggerate it, simplify it, stylize it, or reinvent it entirely.
Whether your goal is classical realism, comics, fantasy illustration, or Pop Surrealism, anatomy provides the foundation that allows imagination to thrive.
Study the skeleton.
Practice gesture.
Observe real people.
Fill sketchbooks with imperfect studies.
Draw often.
Stay curious.
Years from now, you won't remember every muscle attachment or anatomical term.
What you'll remember is how those countless hours of observation slowly transformed the way you see the world—and the way you create it.
That's the real value of studying human anatomy.
Not simply drawing better figures.
But becoming a more observant artist.
About This Guide
This article is part of The Artillerist's Guides Series, a growing collection of educational resources designed to help artists improve their skills through practical instruction, trusted product recommendations, and thoughtful exploration of contemporary art and illustration.
If you found this guide helpful, consider bookmarking it and returning as we continue expanding our collection of resources for artists.
Image Checklist
| Section | Image | Suggested Source |
|---|---|---|
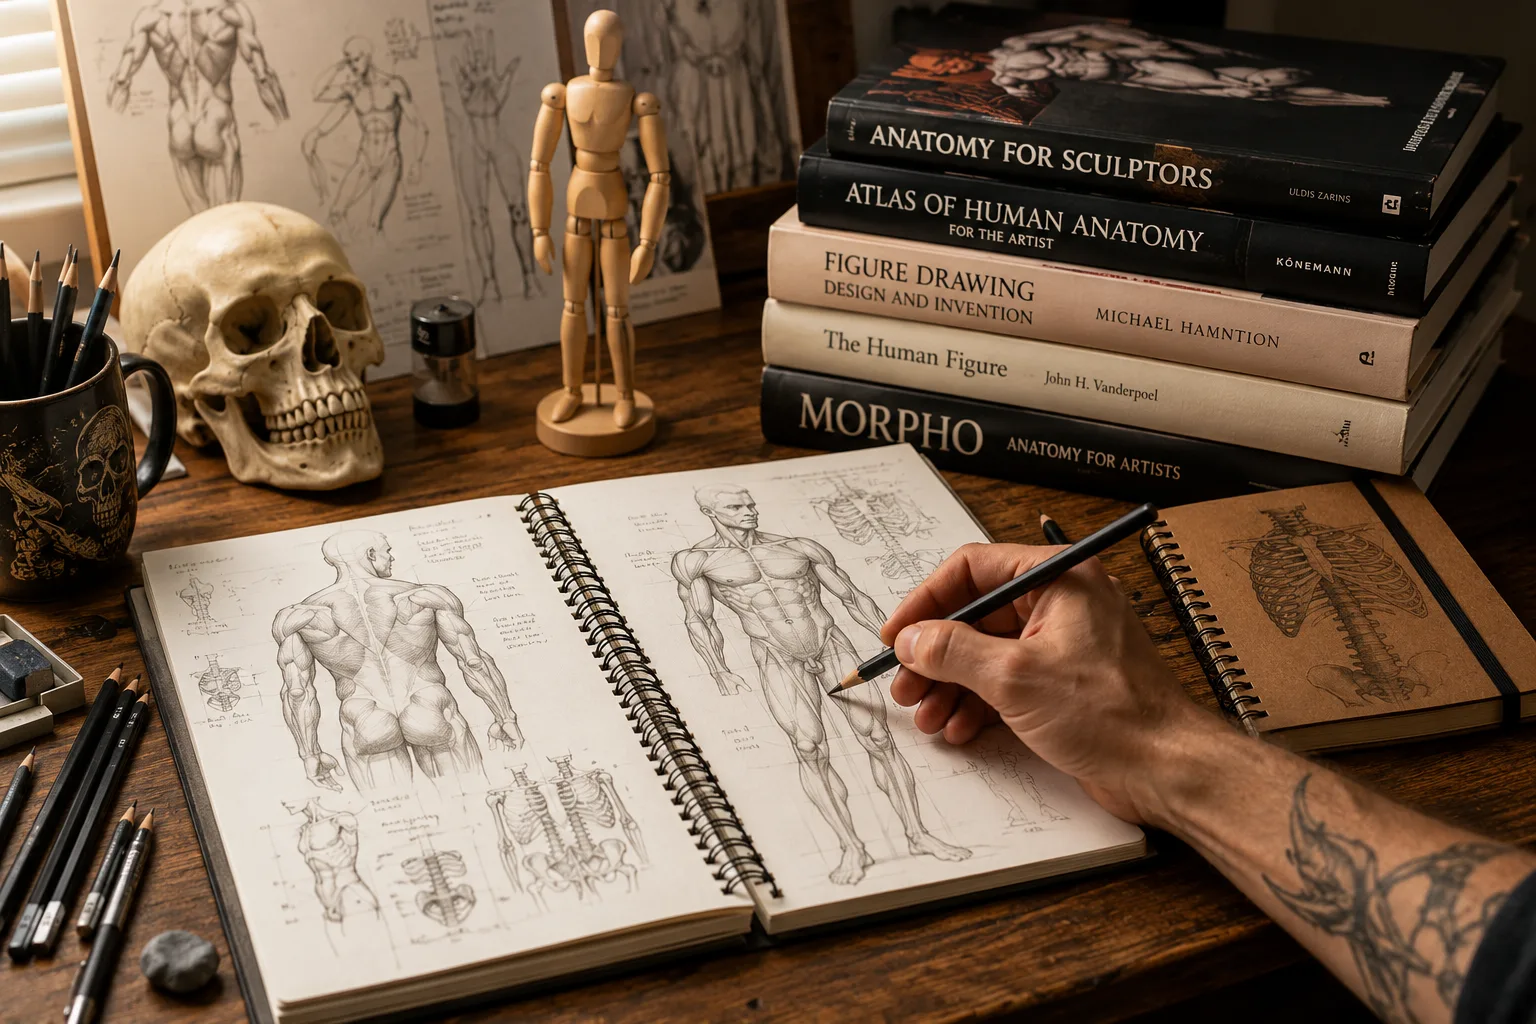
| Hero | Artist workspace | Original AI-generated image |
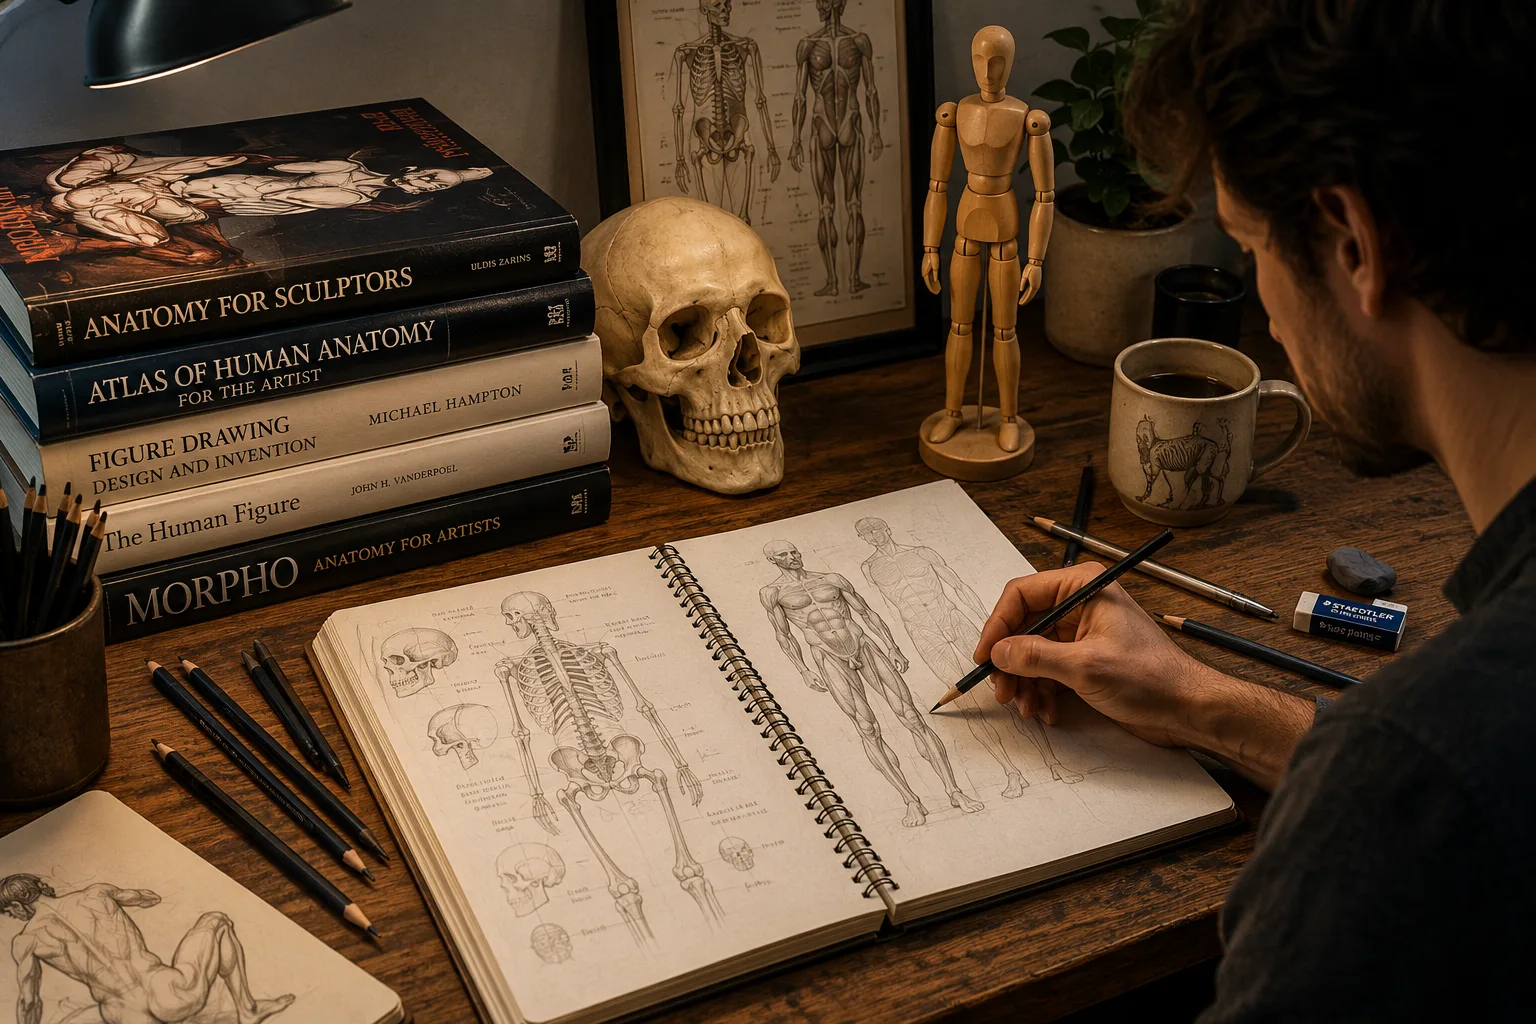
| Why Anatomy Matters | Artist sketching from mannequin | Original AI-generated image |
| Skeleton | Simplified skeleton diagram | Public domain or original illustration |
| Body Proportions | Eight-head proportion chart | Original infographic |
| Gesture Drawing | Timed gesture sketches | Original illustration |
| Torso | Rib cage and pelvis construction | Original illustration |
| Arms | Major muscle groups | Original illustration |
| Hands | Construction blocks | Original illustration |
| Legs | Simplified leg anatomy | Original illustration |
| Feet | Wedge construction | Original illustration |
| Head | Basic head construction | Original illustration |
| Stylization | Realism vs. stylized comparison | Original illustration |
| Recommended Books | Product collage | Amazon affiliate images |
| Drawing Supplies | Product collage | Amazon affiliate images |
Last Updated: July 2026
Estimated Reading Time: 18–20 minutes
Primary Keyword: Human Anatomy for Artists