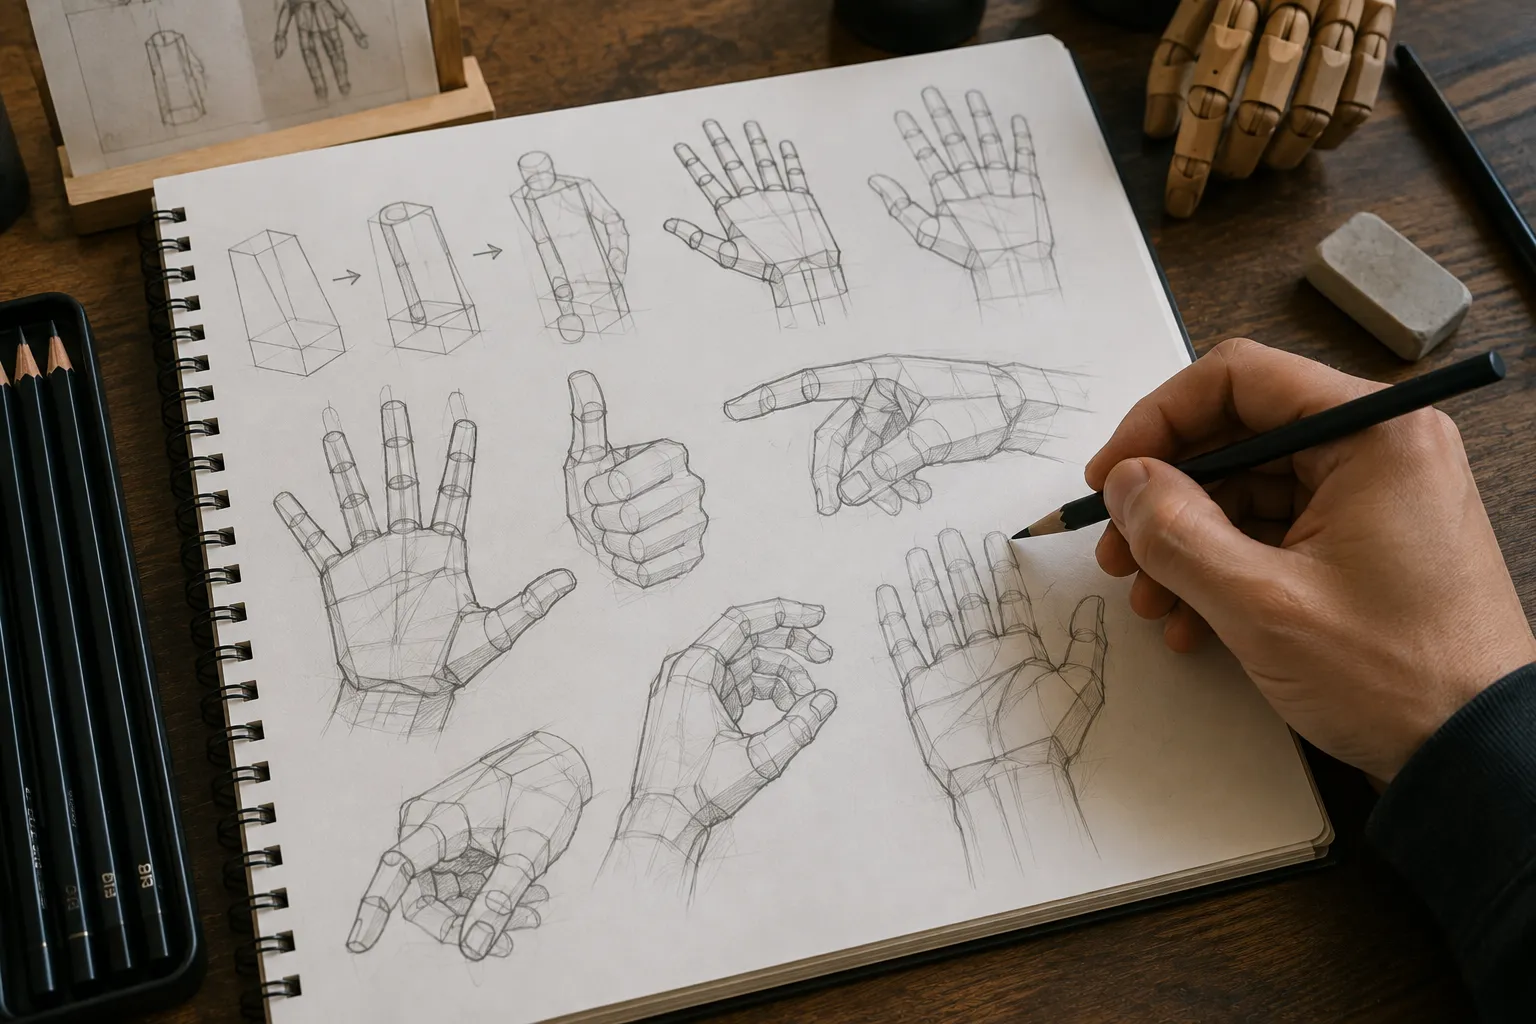
Understanding how to draw hands starts with a mindset shift most tutorials skip: you're not drawing fingers, you're drawing volume. Hands intimidate almost every artist, and most guides respond by walking you through copying an outline stroke by stroke. That produces a hand that looks right once. This guide teaches the same block-and-cylinder construction method from our human anatomy guide, so you can draw hands in any pose — not just the one in the reference photo.
Short Answer: Drawing hands well means starting with simple 3D forms — a box for the palm, tapered cylinders for the fingers — before adding any detail. Most beginner hand-drawing problems come from skipping this construction stage and copying outlines instead, which falls apart the moment the hand changes pose or angle.
Table of Contents
Advertisement
- Quick Facts
- Why Hands Are So Hard to Draw
- Start with Basic Shapes
- Understanding Hand Proportions
- Gesture Before Detail
- Building the Fingers
- Common Hand-Drawing Mistakes
- A Simple Daily Hand-Drawing Routine
- Recommended Supplies
- Frequently Asked Questions
- The Artillerist's Take
QUICK FACTS
| Topic | Drawing Hands |
| Best For | Beginning to Advanced Artists |
| Reading Time | Approximately 10 minutes |
| Skills Covered | Construction, Proportion, Gesture, Foreshortening |
| Recommended Supplies | Sketchbook, Graphite Pencils, Mirror for Reference |
| Difficulty | Beginner → Advanced |
Why Hands Are So Hard to Draw
Hands have 27 bones and roughly as many joints as the rest of the arm combined, which is part of the problem — but it's not the main one.
The real reason hands go wrong isn't complexity.
It's that most artists draw what they remember a hand looks like instead of what's actually in front of them.
That mental shortcut is sometimes called a "symbol hand" — a generic, simplified shape your brain substitutes for real observation. Symbol hands are the single most common reason hand drawings feel flat or fake, even from artists who draw everything else convincingly.
The fix isn't memorizing more anatomy. It's the same fix that works for the rest of the figure: build from simple forms first, and observe rather than recall.
Start with Basic Shapes
Before fingers.
Before knuckles.
Before nails.
There is the block.
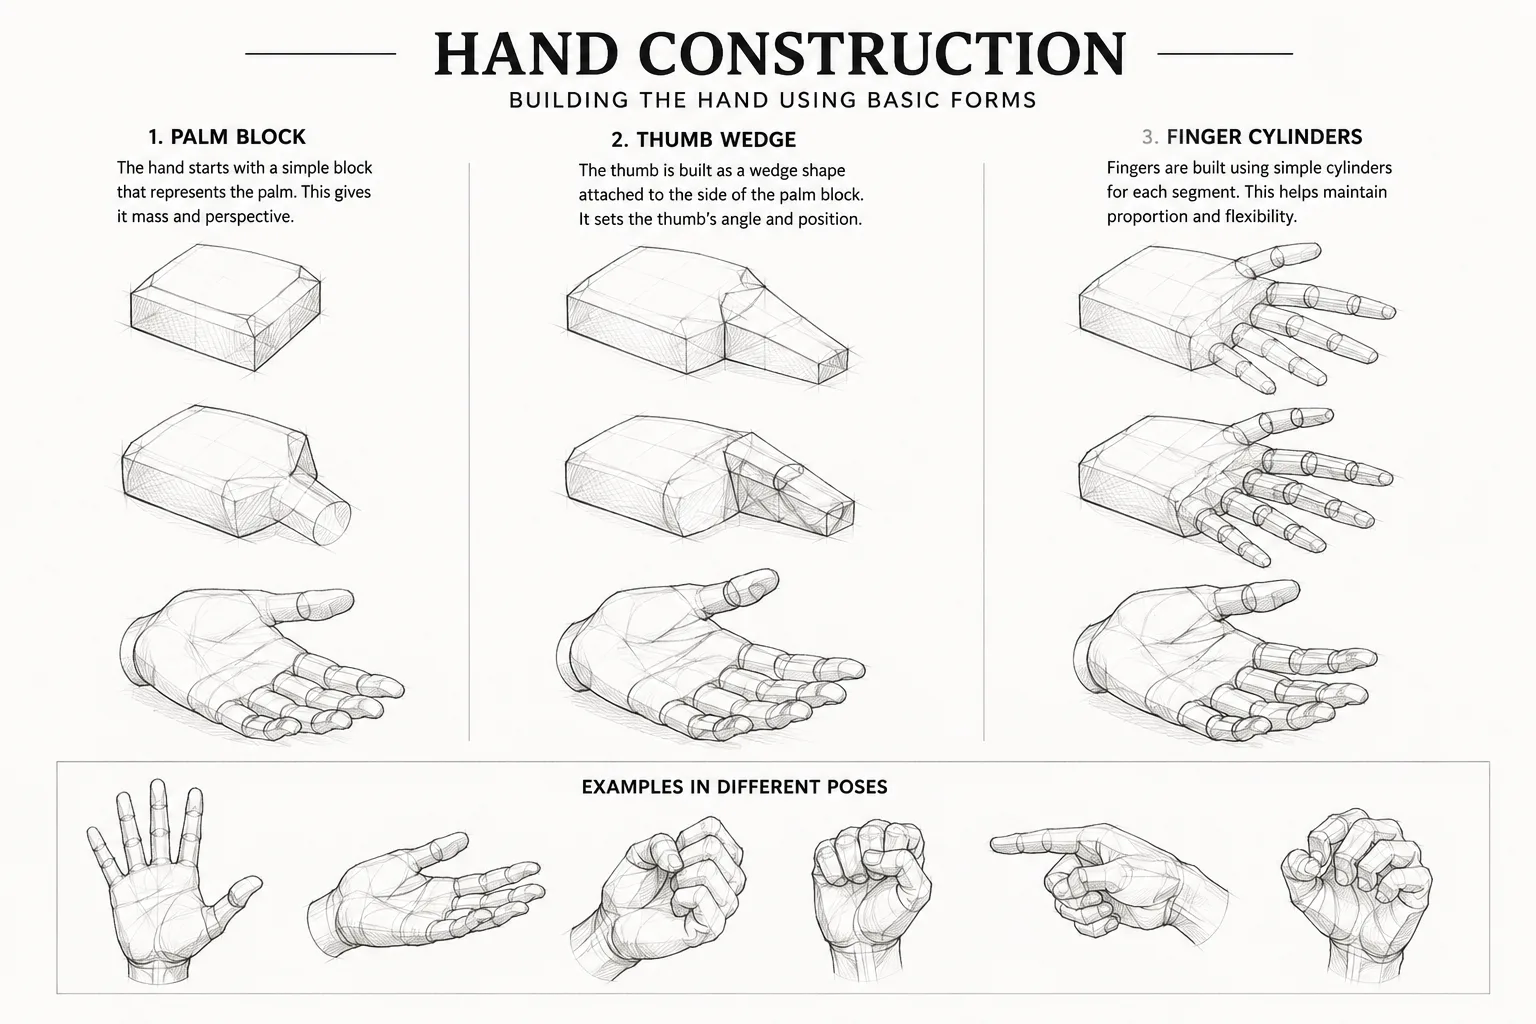
Reduce the hand to two simple forms before anything else:
- The palm — a flattened box, roughly as wide as it is long
- The fingers — tapered cylinders, each divided into three segments by two joints
The thumb gets its own rule: it doesn't emerge from the same edge as the fingers. It roots lower on the palm and at a different angle, which is exactly why thumbs look wrong so often when artists draw them as a fifth finger.
Thinking in these blocks, rather than outlines, means you can rotate the hand mentally, which is the entire advantage construction has over copying. This exact palm-as-box, fingers-as-cylinders approach is also the foundation of Proko's widely-used hand construction method, one of the most established teaching frameworks in figure drawing education — it's not a shortcut we invented, it's the standard approach for a reason.
Artist Exercise
Draw ten palm boxes.
No fingers yet.
Vary the angle each time — flat facing you, turned to the side, tilted away.
Once the box feels solid from any angle, add simple cylinder fingers on top. Don't add joints or knuckles yet. Just get the block and the five cylinders reading correctly as a single 3D object.
Understanding Hand Proportions
A commonly used guideline: the length of the middle finger roughly equals the length of the palm.
That single relationship is enough to catch most beginner proportion errors, where fingers end up too short relative to the palm — a mistake that makes hands read as childlike or cartoonish even in an otherwise realistic drawing.
A few other proportion landmarks worth knowing:
- The fingers taper — each segment is shorter than the one before it, moving outward
- Knuckles are not evenly spaced in a straight line; they follow a gentle curve, higher in the middle
- The thumb typically reaches only to about the first knuckle of the index finger when the hand is relaxed
These are starting guidelines, not rules — hands vary as much as faces do. But they're a reliable check when something in a drawing feels "off" and you can't tell why.
Gesture Before Detail
The same principle that applies to the whole figure applies to hands specifically: capture the action before the anatomy.
A relaxed hand, a fist, and a hand mid-gesture each have a completely different rhythm before you add a single finger detail. Try sketching just the overall gesture line of a hand pose — one flowing curve that captures where the energy of the pose is going — before blocking in the palm and fingers.
Skipping this step is why so many technically correct hand drawings still feel stiff. The bones and proportions can be perfect and the hand will still look dead if the gesture wasn't there first.
Building the Fingers
Once the palm block and basic cylinders feel solid, build up the fingers in this order:
- Block in the three segments of each finger as simple cylinder sections, tapering slightly toward the tip
- Mark the knuckle joints where segments meet — these aren't just lines, they're where the form changes direction slightly
- Add the thumb last, checking that it roots at the correct lower position on the palm rather than beside the other fingers
- Only then add surface details — nails, wrinkles at the knuckles, visible tendons on the back of the hand
Resist adding these surface details early. They're the easiest part to get right and the first thing that distracts from getting the underlying structure right.
Common Hand-Drawing Mistakes
- Drawing symbol hands — a remembered, generic hand shape instead of what's actually observed in a reference or from life
- Making every finger the same length — ignoring the natural taper from index to pinky
- Treating fingers as flat tubes — forgetting they're three-dimensional forms that rotate and foreshorten
- Skipping the palm's volume — drawing it as a flat shape instead of a box with real thickness
- Drawing hands too small — a surprisingly common error relative to the rest of the body, especially in figures where the hand is close to the viewer
- Ignoring foreshortening — a hand reaching toward the viewer compresses dramatically, and fingers pointing at the camera end up looking stubby or oddly shaped if that compression isn't accounted for
Artist Exercise
Pick five hand poses — open palm, loose fist, pointing, gripping an object, relaxed at rest.
Draw each one three times:
Version one: gesture only, a few lines capturing the pose.
Version two: block construction, palm box and finger cylinders.
Version three: finished detail.
Comparing all three stages side by side shows you exactly where a drawing gains — or loses — believability.
A Simple Daily Hand-Drawing Routine
Hands respond to frequency more than duration. A short daily habit beats occasional long sessions.
Five minutes — gesture sketches of your own hand in different poses, using a mirror or your phone's front camera.
Five minutes — block construction studies, palm boxes and finger cylinders only, no detail.
Five minutes — one finished hand study, working through the full construction process from gesture to detail.
Your own hand is always available as a reference, which makes hands one of the easiest subjects to practice consistently — no model, no photo library required.
Recommended Supplies
A hand-drawing practice session doesn't need much. A few tools make it easier to stay consistent:
- Graphite pencil set — for gesture, construction, and finished studies alike View on Amazon
- A small sketchbook you can keep nearby for quick studies whenever you have a free five minutes View on Amazon
- A small mirror propped near your drawing space, so your own hand is always available as a live reference View on Amazon
For a fuller supply list, see our guide to the best art supplies for artists.
Frequently Asked Questions
How long does it take to get good at drawing hands?
There's no fixed timeline, but most artists see a real shift within a few months of consistent, focused practice — often faster than other anatomy, since hands are always available to study from life.
Do I need to memorize hand anatomy in detail?
No. Understanding the palm as a box, the fingers as tapered cylinders, and the basic proportion relationship between finger and palm length covers most of what you need. Deeper anatomical study helps, but isn't required to draw convincing hands.
Why do my hands look stiff even when the proportions are correct?
This almost always means gesture was skipped. Correct proportions on a pose with no underlying gesture line still reads as lifeless — capture the movement first, then build the construction on top of it.
Should I use photo references or draw from my own hand?
Both. Your own hand is the fastest, most available reference for quick studies, but photos and life drawing sessions expose you to poses and angles you can't easily hold yourself.
What's the fastest way to improve at drawing hands specifically?
Short, frequent studies of your own hand in varied poses, paired with the three-stage exercise above — gesture, construction, detail — done consistently rather than occasionally.
Continue Your Artistic Journey
Hands are one piece of a much larger picture. Continue building your skills with these guides from The Artillerist:
- The Complete Guide to Drawing the Human Anatomy for Artists
- Best Art Supplies for Artists (2026 Buyer's Guide)
- Color Theory for Artists (coming soon)
The Artillerist's Take
Hands don't punish beginners because they're complicated. They punish shortcuts.
Every other part of the figure can survive a bit of guesswork — a shoulder that's slightly off reads as stylization. A hand that's slightly off just reads as wrong, because everyone who's ever looked at their own hand has an intuitive sense for what one should look like, even if they couldn't explain why.
That's actually good news. It means the fix is narrow and learnable: stop drawing the hand you remember, and start drawing the block, the cylinders, and the gesture in front of you.
Do that consistently, and hands stop being the thing you avoid in a drawing. They become just another shape.
Bottom line: stop drawing the hand you remember. Build the palm box, the finger cylinders, and the gesture first — the detail takes care of itself once the construction is right.
About This Guide
This article is part of The Artillerist's Guides Series, a growing collection of educational resources designed to help artists improve their skills through practical instruction, trusted product recommendations, and thoughtful exploration of contemporary art and illustration.